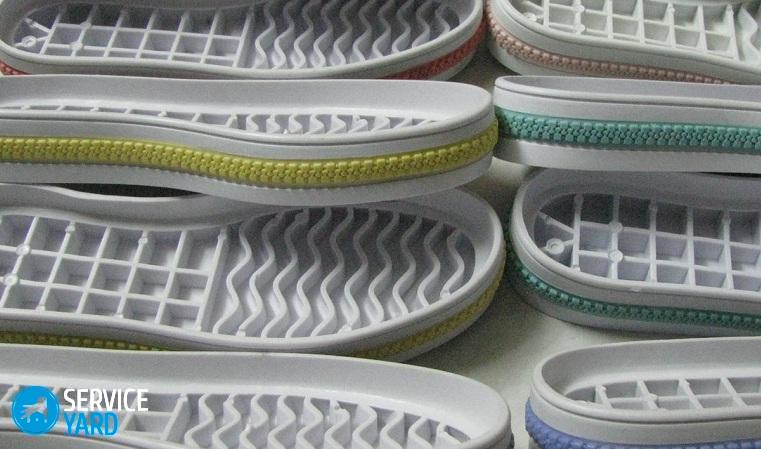
DIY sole for knitted shoes

Even the world famous designers do not dare to challenge the popularity of knitted shoes. Every year it becomes even more interesting, more original. And this is no accident, because even our grandmothers used to knit slippers in addition to socks. Any new materials, opportunities for its creation constantly appear, therefore it is really not a shame to appear in public in it. To date, the sole for knitted shoes has become quite diverse. It’s not difficult to create such a product with your own hands, because the range of quality yarn is also quite large. We will tell you about different options in this article.
to contents ↑Features of knitted shoes
Shoes and handmade clothes occupy fairly solid positions in the modern world of fashion. Today knitted can be both domestic tracks and street shoes. Naturally, it is difficult to surprise someone with children's knitted sandals, but you can not often meet a girl in such homemade sandals. This is due to a certain uncertainty about how such things are convenient and reliable.
Important! Much here depends on the quality of the threads used, the density of knitting, the method of attachment to the sole of the knitted top. With all confidence, only one thing can be said: such shoes look incredibly impressive, original, not a single fashionista will be left without attention.
Now you will see that it will be very easy to do everything:
- It is best to use a ready-made sole, for example, from old sandals.
- The easiest way is to fix the thread to the place where it was sewn and start to knit from the base.
- Holes are made easily with a conventional sewing awl.
DIY knitted loafers
Even if you do not have such experience in needlework, with maximum effort, you can achieve a wonderful result. It is better to start with something simpler - it may be light knitted shoes on the soles. You can make crochets with your own hands, for example, moccasins.
Materials for work
Prepare for work:
- yarn;
- metal hook;
- unnecessary shoes to use its sole.
Workshop on manufacturing
The following manipulations will be required:
- Cut off the fabric from old shoes, pierce the sole for tying along the edge in a circle as close as possible to the upper edge.
- Take the main thread, tie the edge of the sole. Just thread the hook from the outside in to the hole, grab the thread, pull it out so that you get the loop.
- Next, drag another loop from the next hole, knit them together. Repeat this action in a circle, fasten and cut the thread.
- Take yarn for moccasins, tie the sole in a circle under the arches formed in rows to a height of 2 cm with a lifting loop.
- Cut and hide the threads.
Then your work will look like this:
- Measure the length of the sole, place markers on both sides on half the length.
- Also mark the middle of the front of the product.
- Measure the widest part of the foot on the sole, take half, measure on both sides in the middle of the marker. You will get a toe. This is approximately 9 loops or 4.5 cm.
- Knit further on the back halves of the loops, at the end climb to the next row. To do this, in the next two loops, knit 2 connecting posts and turn the moccasins with the heel towards you, in the opposite side, knit the second row.
- Again, in the next two loops of the sidewall, knit 2 columns, finish all the rows with them.
- Start adding from the third row in the front rows to expand the toe, knit 2 columns in each first and last loop. Knit a toe in this way to the markers.
- Getting to the tongue. Tie 2 cm without increase, this is about 4 rows. Start the reduction as follows: on both sides, cut the loop through the row three times, that is, only the loops in the front rows. The tongue will turn out to be about 7 cm wide, then knit another 7 rows without changes, close the loops, remove the threads. Tie the finished tongue with single crochet posts.
- We start knitting the backdrop. Measure 3 cm from the point where the toe with the sidewall connects towards the toe of the moccasins. Knit the front halves of the loops directly along the tongue, then the heel is already in both halves of the loops in a circle, that is, around the heel, turn and knit another row in the opposite direction from one marker to another.
- Reduce one loop, make a single crochet, over the next two columns, knit 2 air loops, you get a hole for the lace. About 4 columns to the end of the row, tie 2 air loops, then another column through 2 single crochets, but do not knit the last one to make a reduction.
- Knit all loops in the opposite direction with regular columns. You will get two pairs of rows, with a hole and without it. Alternate the pairs so that there are 3 holes on each side.
- Tie a 90 cm long chain of lace stitches, add Italian Lurex.
Your chic loafers are ready!
to contents ↑Original knitted boots
It is even easier to make knitted shoes with your own hands, something like boots that are firmly in fashion. Any girl dreams of such beautiful and light shoes. The master class below will help you create it yourself.
Materials for work
You will need to work:
- Sole from old boots.
- Felt insole.
- Genuine leather and high-quality skin substitute.
- Cotton fabric.
- Awl.
- Knitting hook.
- Threads of two colors, preferably hard and durable, so that they keep their shape well.
Follow these steps.
Sole binding and insole preparation:
- Cover the felt insole with cotton on one side and leather on the other.
- Remove the fabric upper from the boots, but leave the threads at the heel and toe points.
- Pierce the sole with an awl from the edge at a distance of 2 mm and 4 mm from each other, tie the holes obtained next to the single crochet posts.
Making the bottom of the boots:
- Attach the thread in the center of the sock, knit 2 rows with single crochet.
- Knit the third row as follows: lifting loop, 3 single crochet.
- Turn the knitting, starting from the second loop from the hook, knit 6 single crochet stitches.
- Check that the posts are clearly centered on the toe.
- Then knit 2 more stitches on the sole.
- Turn around again, starting from the second loop, knit the row to the end, knit 2 loops on the sole, turn the knitting again.
- So continue to work until the sock is completely fabric.
- Try a boot on your foot, maybe it's time to stop. You will get about 22 rows.
Toe knitting:
- Since you used to make an addition, then starting from the next row, knit two rows without increments.
- The next row again with one increase, then two without increase, and so alternating another 10 rows.
Important! It’s better to record the whole course of work so that the second boot comes out exactly the same.
We knit the heel:
- Go down to the sole again, you will knit the heel with single crochet, skipping the corner loops, then knitting to the toe and sole, again skipping the corner loop.
- Expand the work, start knitting again from the second loop, tie the heel with ordinary columns to the angle between the toe and heel.
- A connecting loop will come out on your hook, start knitting further from the second loop of the row.
- Continue to the corner again, repeat the previous paragraph.
- Once the heel reaches the desired height, knit 4 single crochet in a circle.It is important that the boot fits tightly on the leg, so in some places you may have to reduce the loop.
to contents ↑Important! Tie the original flowers for decor, so that your boots sparkle with new colors.
Stock footage


Yes, you will have to work a lot, make efforts, spend your time, show utmost attention and accuracy, but your crocheted shoes on the soles with your own hands will immediately kill everyone around you.
- How to choose a vacuum cleaner taking into account the characteristics of the house and coatings?
- What to look for when choosing a water delivery
- How to quickly create comfort at home - tips for housewives
- How to choose the perfect TV - useful tips
- What to look for when choosing blinds
- What should be running shoes?
- What useful things can you buy in a hardware store
- Iphone 11 pro max review
- Than iPhone is better than Android smartphones


