Remaking an old chair with your own hands

If you have an old chair at home that has completely lost its attractive appearance or functional qualities, then you can try to restore it, instead of immediately sending it to a landfill. Moreover, the alteration of the old chair with their own hands should be done before the degree of wear and tear reaches the maximum limit. The restoration process itself is quite fascinating, you can’t call it too complicated, but it takes a lot of time. Today we will tell you how to independently restore old furniture at home.
to contents ↑Remodeling options for an old chair
Given that there are varying degrees of damage to standard furniture, experts identify several types of alterations and restoration, which differ in their level of complexity.
Popular types of rework chairs:
- If the chair simply outwardly deteriorated or became loose, then it is enough to change the spike joints that have dried up from time to time.
- If the grooves and spikes are weakened, then it is necessary to carefully examine it, remove it from the sockets and increase the size of the spikes, then replace the power jumpers. That is, a complete overhaul of furniture is supposed.
- If the frame is still intact, it holds well, the chair has only become outwardly unappealing, then it is enough to replace the cover. To varnish wooden details, previously having removed an old layer.
- Molded and carved elements perfectly complement chairs, so you need to replace them, stock up on time, patience, and show maximum accuracy.
- Upholstering is considered the simplest type of restoration, thanks to it the furniture is transformed beyond recognition.
Remodeling a chair with your own hands, as a rule, does not drag out for a long time, if you have certain skills.
to contents ↑Necessary materials and tools for restoration
To completely sort out the chair, it will take time and a lot of tools. Each detail must be thoroughly sanded, remove layers of grease and dirt, previously washed in soapy warm water, dry well. Basically, old paint and varnish disappear even during the washing process - it is enough to take an iron brush to simplify this process.
It is necessary to prepare the following materials for work:
- Sintepon, foam rubber, latex for filling.
- Scissors.
- New upholstery quality material.
- Hammer.
- Screwdriver Set.
- Screwdriver and screws.
- Special staples and stapler.
- Sandpaper or grinder with grinding wheel.
- Metal clamps.
- Clamps.
- Joiner's glue.
- Stain, paint, solvent, nitro-varnish, paint brushes.
A complete set of tools is formed on the basis of what specific operations were planned for restoration.
to contents ↑Dismantling the chair before restoration
To disassemble a chair, you will not need many tools:
- The armrests and backrest are loosened and removed more strongly, with a little effort, trying not to completely break the wooden spikes.
- Even the spikes that are weakly seated in the nests are much easier to get in whole than in pieces.
- Using a soft-cloth hammer, the joints can be disconnected.
- Particularly carefully disassemble should be strong joints, because they are very fragile.
- Some connections are fixed with screws with stuck or torn threads. To soften them, you need to drip a little technical oil on them, the torn thread is removed with pliers.
- With the help of hot water, all glued joints are easily disconnected, a rag is moistened in it, then put on the place of gluing.
Important! Each fastener and part is recommended to be marked so as not to get confused later.
Knowing these simple secrets, you will disassemble the chair yourself quickly enough.
to contents ↑Restoring wood parts
You have already disassembled. Next, before remaking the old chair with your own hands, you need to do the removal of the upholstery, washing and sanding all the elements:
- If you find cracks, then they should be glued together, tightly tightened together with clamps.
- Minor defects can be eliminated by gluing with paper tape.
- Round large details will help to connect metal clamps.
- Chips and holes formed must be filled with a mixture of sawdust and glue.
Important! Restoration will not give the desired effect if you do not let the glue dry completely. Therefore, let the parts dry for two days.
The parts are then sanded with sandpaper to achieve a perfectly smooth surface.
to contents ↑Glue processing and assembly
At this stage, all joints and gluing places are inspected once again:
- Parts that have lost their volume are wrapped with a bandage, pre-lubricated with glue, tight turns on each revolution.
- The legs emerging from the nests are wedged by drilling at the ends of the cracks and driving a wooden wedge. Due to this, the diameter of the end increases, the legs become more durable.
- Using a syringe, glue is injected into weakened joints through thin holes drilled from the inside.
- Additionally, it is recommended that the seat be secured with metal corners on the outside to give it strength.
- Having disassembled and glued all the joints well, trapezoidal bars are screwed to the corners of the frame.
Important! In the assembly process, it is better to use clamps and clamps to tighten the frame, since under pressure the glue clings better.
The glue that protrudes from the joints is simply cleaned with a cloth, all parts are wiped dry. In this form, the frame should stand for another two days, only then you can proceed to the final stage of finishing the chair.
to contents ↑Replacing the upholstery of an old chair
Naturally, thinking about how to remake a chair with their own hands, everyone dreams of transforming it outwardly.
You must do the following:
- After gluing and assembling, cover the frame with stain, manually paint. You can also use decoupage or burning techniques to decorate.
Important! The more layers of varnish you put on the tree, the more beautiful it will look, the main thing is that there are no bumps or bubbles.
- Cut the foam rubber along the contour of the backrest, seat, armrests with a sharp knife.
- Cut upholstery fabric in the shape of the back, seat and armrests, but do not forget to add allowances for the hem, as well as the thickness of the inner filling.
- Lay out the cut fabric on the table face down, put filler on top of it. Tuck the fabric inward, fasten with stitches, transfer to the frame, starting from the seat.
- Fix the edges with a stapler, leveling, pulling the surface of the material as much as possible. Perform the same manipulations with the armrests and backrest, trying to fix the fabric more tightly.
Stock footage
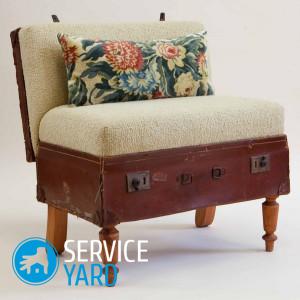
Now your armchair will again look like new, fits perfectly into the modern home interior. There are many more options that can be made from an old armchair, using this knowledge, you can turn it into a real decoration for any home.


