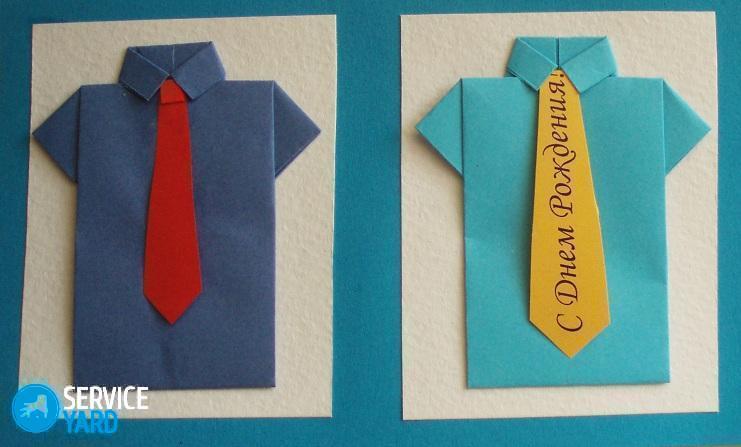
DIY shirt and tie

As soon as the time comes for holidays, especially for men, all women begin to think about how to decorate a gift for a beloved man in an original way, be it a husband, father, son or brother. In this matter, every little thing that is able to cheer up and demonstrate all the care and love is of great importance. When a gift has already been bought, it remains only to purchase a card or find some unusual packaging. If you want to really surprise your men, then you will certainly like the following idea - a postcard-shirt with a do-it-yourself tie made from improvised materials. Today we will tell you how to make such an original craft yourself, which can be used as a postcard or packaging.
to contents ↑How to make DIY packaging in the form of a shirt?
First of all, let's look at how to make a shirt out of paper with a tie, and then use it as a package for an existing presentation. If the gift has a flat shape, not too voluminous, then this idea is ideal for you. For work, we use the origami technique, that is, the art of folding all kinds of figures from paper without using glue. In such packaging you can put not only a gift, but also a card with sincere wishes.
Prepare an A4 sheet for work, you can use beautiful scrapbooking paper or regular office paper.
Pack by following these instructions:
- Gently fold the paper in half along the long side. Expand, then fold the edges of the sheet towards the resulting fold line.
- Expand the workpiece, in the lower part fold small triangles before the folds begin. Again, fold the edges to the center.
- 5-6 cm to the center, wrap the bottom edge.
- Turn the blank back so that the triangles folded on the sides look like the sleeves of a future shirt.
- Turn the craft over to the other side, then fold the top edge 1-1.5 cm.
- Turn the workpiece over again, fold the upper corners to the center to form a collar.
- Fold the workpiece so that its lower edge is directly below the collar.
Now you know how to make an origami paper shirt to get the original packaging. You can decorate it with a butterfly, pocket, buttons, or some other interesting element.
to contents ↑Important! Using the same pattern, you can cut a blank from thick colored cardboard for packing a bulk gift. To make a box, it is enough to glue all the elements on top and left. Then the gift is placed inside, wrapped, a collar is glued on top.
How to make a beautiful card with a tie?
A postcard in the form of a shirt with a do-it-yourself tie is even easier to create than packaging. To recreate this idea in practice, it is necessary to prepare the following materials:
- A sheet of paper for scrapbooking or design.
- A few small buttons.
- A thread with a needle.
- Glue.
- A sheet of plain white paper, multi-colored paper, so that in color it is combined with the style of the future product.
- Envelope for postcards.
Perform the work according to the proposed scheme:
- From the scrapbooking paper, fold the shirt according to the scheme described in the previous workshop.
- Decorate the craftsmanship with buttons, sew them on or glue them.
- Fold colored paper in the form of a book, glue a sheet of white with slightly rounded edges on top.
- Decorate the card with a finished shirt on top.
- Write a beautiful congratulation.
Such a wonderful postcard can be made without the use of origami techniques. It will take one sheet of plain colored paper and for scrapbooking, glue. Making such a craft will take no more than ten minutes. All you need to do is a few steps:
- Fold the scrapbook paper in half in the shape of a book.
- Make a small cut about 1-1.5 cm exactly in the middle at the top of the cover.
- Bend the corners formed during the incision to the side to get the shirt collar.
- Cut the tie out of colored paper, then glue it on top of the card.
Everything is ready, it remains to write beautiful words in it to a person dear to you.
to contents ↑How to make an invitation card for a men's holiday?
As a rule, cards are given in addition to the main gift, but presenting it in a finished form with standard text is somehow impolite. A self-made paper shirt with a tie can be used not only as a postcard, but even as an original invitation.
For work should prepare:
- sheets of colored paper and for scrapbooking;
- a simple pencil;
- scissors;
- ruler, glue;
- beads, ribbons, rhinestones or threads for decor.
You must do the following to create an unusual invitation.
Base manufacture
We will do it from simple office tinted paper for printing. From one sheet you get three basics. It is necessary:
- Divide the sheet into three equal parts.
- Then fold each rectangle with an accordion, while observing the necessary proportions.
- Define the right side of the framework, because the main text is located on it.
- Start folding the accordion on the right side.
- To prevent it from disintegrating, connect the inside of the product with a drop of glue.
- Iron thoroughly, for a while put the blank under some heavy object so that the pages turn out to be smooth, straight and neat.
Shirt making:
- Select the appropriate pattern. Better use scrap paper. Draw a rectangle with sides of 15 and 8 cm, then cut it out.
- Define its middle, just fold it with the white side inward exactly in half in length.
- Bend the workpiece, then bend the right edge by 5 mm.
- Fold the top and bottom sides to the center line.
- Make an outer lapel on the right side to get the sleeves of the shirt.
- Turn the figure, bend a strip of 1 cm wide on the left side.
- Turn the workpiece again.
- Bend the lower and upper corners to the center on the left side to form a collar.
- Connect the right and left parts of the workpiece.
- Tuck the right side under the collar.
- Glue the shirt to the card.
Making a tie:
- Cut a square of colored paper with a side of 3 cm, then fold it diagonally.
- Fold both sides toward the center.
- Turn the workpiece over, bend down one third of the top corner.
- Then lift it up so that a small crease forms in the middle.
- Turn the figure over and bend down the upper corner.
- Bend the left and right sides of the center.
- Smooth well.
- Fold back the edges with a drop of glue.
- Tie tie with a shirt.
- Place and secure the shirt on the first page of the postcard.
Stock footage


This master class explains in detail how to make a card a shirt with a tie that will stand well upright. On the second and third pages you can set out an invitation to the upcoming holiday or congratulations, then your gift will definitely be remembered for a long time!


Report typo
Text to be sent to our editors: