DIY transformer blanket for a newborn - master class
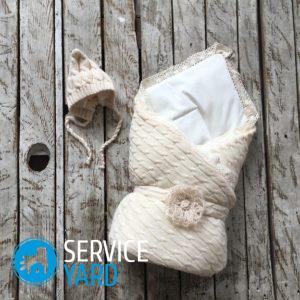
In anticipation of a long-awaited meeting with the baby, the expectant mother tries to prepare as much as possible and choose not only beautiful things, but also high-quality ones. Thanks to the modern assortment, picking up a beautiful bonnet, sliders, diapers and an envelope is not a big deal. But I really want the main attribute for the discharge of the baby from the hospital was not only unique and exclusive, but also served in the future. We offer you to make a transformer blanket for a newborn with your own hands - you will find a master class in the form of detailed step-by-step instructions in this article. You can make this rather multifunctional thing, even without having the minimum skills of cutting and sewing.
to contents ↑Necessary materials and tools
Starting work on the manufacture of a transformer blanket for a newborn with their own hands, it is necessary to prepare the following materials, tools and accessories:
- Heater for example, alpolux;
Important! In addition to alpolux, for insulation you can also use synthetic winterizer or isosoft. It should be chosen based on what season the blanket is designed for.
- Material for exterior decoration;
Important! The most commonly used is velor, as it is soft and stretches well. For lack of such, you can use thicker fabrics for sewing children's clothes - cotton, raincoat fabric and flannel are suitable.
- Soft knitwear for interior decoration;
- A small flap of fabric for the pocket;
Important! Try to choose natural and environmentally friendly fabrics. This eliminates the possibility of various allergic reactions and rashes on the body of your baby.
- Gum;
- Threads in color;
- 2 detachable zippers;
- Overlock;
- Scissors;
- Sewing machine;
- Ruler;
- Needle;
- Tailor's marker;
- Tailor pins;
- Cloth glue.
How to sew a transformer blanket with your own hands?
After all the materials have been prepared, the size of the future product should be calculated. The standard size of such blankets is considered to be 75x75 centimeters, taking into account the fact that basically children are born with a height of 45-60 centimeters.
Important! In order for such an envelope to serve at least three months, it is best to cut a blanket measuring 80x80 centimeters.
Once you have decided on the parameters of the future product, you can proceed directly to its manufacture. The sequence of actions is as follows:
- Cut 2 squares of fabric for exterior and knitwear.
Important! When cutting out the base of the future product, do not forget to add 1-1.5 centimeters for allowances on the sides.
- Similarly, cut a square equal to the first two from the insulation.
Important! To ensure that the seams are not too coarse and bulky, you can cut out the insulation without adding allowances.
- Connect insulation and fabric for the upper trim with tailor pins. Walk on all sides with an overlock and mark the top and bottom edges.
- Sew zippers to the top and bottom. This should be done with an “exploratory” seam, as close to the edge as possible.
Important! Try to buy detachable zippers, as they are much easier to work with. This is due to the fact that you can unfasten it and carefully sew on each half.With one-piece zipper this will not work, and you will have to work hard to stitch it.
- Use tailor pins or a marker on the top edge to mark exactly in the middle.
- Next, make a pocket. It must be cut out on the basis of the following calculations: divide the length of one side of the finished product in half. This will be the width of your pocket. Choose a length arbitrarily. It can vary in the parameters of 20-35 centimeters.
Important! For dense fabrics, the pocket should be trapezoidal in shape.
- Using a remnant or a tailor's marker on the finished blank, mark the future location of the pocket. To do this, draw a straight line from the mark located on the upper edge of the workpiece. Set aside 20 centimeters from it.
Important! If you wish, at this stage you can decorate your pocket. It can be embroidered manually or on a typewriter, stitching various decorative lines or gluing a thermal transfer picture. It all depends on your imagination and taste preferences.
- In accordance with the dimensions of the future pocket, cut out the insulation and sew it to the workpiece. This is necessary so that the baby is even warmer.
- Next, for the pad, cut out two shreds measuring 42x24 centimeters and 42x7 centimeters. Attach a large flap with the help of tailor pins to your pocket, stitch under the overlock.
- Glue a narrow strip with a special glue to the place where the gum will be located.
Important! Do not forget that only the edges of the strip should be smeared with glue, but in no case the middle.
- Turn the finished pocket blank to the front side, sew with an overlock or make a few seams on a sewing machine.
- Using the pins, pull the elastic into the drawstring and leave the ponytails.
Important! The length of the elastic in unstretched condition should be about 85% of the entire length of the pocket.
- Sew along the edges of the drawstring, strengthen with reverse stitching.
- Face to face, attach both parts of the pocket, work with overlock.
- Turn the pocket onto your face, sweep the sides, then sew on the sewing machine.
- Put the finished pocket face to face with the main blank under the blanket. Fasten everything with pins.
- Sew a pocket to the main stock.
- Face to face with the main blank, attach a lining flap of fabric and attach it with pins. Sweep both pieces.
- At the bottom of the entire structure with pins mark the “entrance” with a width of 20 centimeters. This is necessary so that in the future the blanket can be turned out.
- Sew all sides of the blanket, except the section you marked earlier, and twist the finished blank onto your face.
- Using knitting needles, line the corners.
- Using a thin needle for embroidery with beads and filament yarn, sew a non-sewn hole.
- Align the perimeter of the blanket from one side of the pocket to the other using a sewing machine.
- Iron the product thoroughly, clean from excess thread.
That's all, the transformer blanket is ready! Now you can safely put your baby in it before going for a walk. To do this, fasten the top zipper so that it forms a corner. As for the bottom zipper, you fasten it at your discretion, based on weather conditions.
to contents ↑Important! You can also adjust the location of the pocket. It can be both below the baby, and on top. For this child, carefully lay on the barrel and turn the pocket outward with the front side out.
Stock footage
As you can see, it’s not difficult to sew a transformer blanket on your own. Using our recommendations, you will make such a product as soon as possible. And with patience, love and a little imagination, you can sew an original blanket that will warm your baby and give him care, warmth and a feeling of mother’s hands.
- Mattress for newborn
- How to sew a mattress on a changing table with your own hands?
- How to sew baby bedding in the crib with your own hands?
- Sides for the crib photo 🥝 for newborns, patterns for the sides in the crib
- How to decorate a crib for newborns with their own hands?
- Washing clothes for newborns
- How to sew a jumpsuit for a newborn with their own hands? Patterns
- DIY baby clothes - patterns
- Which baby soap is best for newborns?
- Do I need to boil water for bathing a newborn?
- Bottles for babies - which are better?
- How to wash baby bottles?


