DIY metal furniture
Metal furniture can be an excellent solution for both the garden and the kitchen, especially if it is made in the style of Hi-tech or Modern. The basis for such products can be profile pipes and sheets of metal of a certain thickness, which are easy to find in construction stores. Therefore, if you decide to equip your kitchen or garden with such products, we will tell you how to make metal furniture with your own hands.
to contents ↑Basic work methods
The process of making metal furniture is quite simple. However, you may experience some difficulties while working with this material. In order to avoid them, we offer you some tips:
- Basically, round blown elements are used for the manufacture of furniture, therefore, it is very important that the bend is as even as possible. To do this, you will need the simplest bending tool that you can make from the brake disc, and the process of bending the elements should take place in the following order:
- Close one end of the tube with a stopper, fill it with sand, and then close it on the other side.
- Place the tube in the bending device while clamping it between the pin and the protrusion on the disk.
- While applying physical effort, bend the pipe at the angle you need.
Important! In order to facilitate the bending process of the steel tube, you need to heat the place of the future angle with a blowtorch until reddening.
- In order for the details of the product to turn out the same for you, you will need a tool such as a plasma. This is a sheet of plywood or cardboard on which the outline of the part you need is applied. Thanks to him, you can at any time check the difficult-curved element of furniture with a pattern for compliance with the contours.
Important! If there are several parts at once, then they should also be checked among themselves, applying to each other.
- Elements for future furniture are fastened by welding or threaded connections, and sometimes wooden bushings are also used for these purposes.
Important! Pay attention to the fact that duralumin pipes cannot be welded, therefore fastening should be carried out exclusively with bolts or screws.
- After finishing work, the weld must be processed with a grinder or file until a flat surface is reached, after which clean metal from rust and polish.
How to make a metal chair with your own hands?
We offer you to make a bar stool with your own hands, which will become a bright highlight of your kitchen. For its manufacture, you will need metal trimmings, as well as the remains of a metal profile and sheet iron.
The procedure is as follows:
- On the bed for welding, draw a sketch of the future seat.
- According to the sketch, cut the required number of workpieces from a metal strip 25 millimeters wide and weld them together into a single contour.
- For interior decoration from the same strip, cut the workpieces and weld them together into the finished workpiece of the seat. Round the corners.
- Weld the legs from the profile with a size of 20x30 millimeters to the seat. To do this, grasp the legs in one welding spot and gently push them to the position you need.
- Measure the level of foot rest and make the necessary notes.
Important! To measure the level of foot rest, always focus on the height that is comfortable for your height.
- Make an emphasis for legs from a profile of 30x20 centimeters.
- Make wooden “heels” for the legs. They do not scratch the floor, and you can always correct them to the size you need. In addition, such plugs do not need to be fixed with screws or with glue, since they also hold well on their own. The most important thing is to polish the heels to the size of the legs of the chair.
That's all, the chair is ready! Now you need to paint it:
- First, apply a layer of soil to the product, and after that - paint the lower part of the chair with black paint.
- Wait for it to dry completely.
- As soon as the black paint dries, wrap the bottom of the product with foil and paint the seat with red paint.
Making a folding garden chair
The versatility of such a product lies in the fact that at first you get a stool, and by attaching a back to it, you will have a full-fledged chair. In addition, it is convenient to take it with you on various trips to a picnic and barbecue, as in the car it takes up very little space when folded. In order to make such metal chairs with your own hands, you need to adhere to the following procedure:
- Take two identical lengths of aluminum pipe.
- Bend each of the pipes so that you get a closed rectangle with rounded corners.
Important! Pay attention to the fact that the length of the larger side of the rectangle will be equal to the total height of the stool. The width of one rectangle should be slightly smaller relative to the second. This is necessary so that you get a clearance when connecting two workpieces.
- Connect the opposite ends of the pipe with a clamp or welding.
- In the middle of each of the long sides of the rectangle, drill holes.
- Align the rectangles so that they coincide with the holes.
- From the outside, insert a pin or bolt into the hole so that it passes through both pipes.
Important! The diameter of the bolt must be such that both pipes rotate around its axis without any problems.
- On the opposite side of the bolt, do not fully tighten the nut. In order for it not to unwind, it must be fixed on both sides with locknuts.
- Sew a seat from a durable tarpaulin.
That's all, a metal stool with your own hands is ready! Now we turn to the manufacture of the back to get a full chair. For this:
- Take another aluminum pipe and bend in the shape of the letter “U”.
- When unfolded, fasten the bolts to the back of one of the legs.
As a result, you have a great folding chair.
Important! The company can make this weighty metal chair light furniture from improvised materials that everyone has at home. For ideas on creating and a list of everything you need to make, learn from our selection of materials:
to contents ↑
Making a metal table
Such a table will become a bright highlight in your garden or on the summer terrace, as the manufacture of furniture by hot forging provides immense opportunities. If this is your first encounter with this craft, we suggest you make a metal table with your own hands, following the proposed sequence of actions:
- Using a steel brush, clean the parts from dirt and rust.
- Make a stencil for future bent elements.
Important! In case you do not have many bent elements, you can do without preliminary stencil production.
- Weld two studs with a distance of 2-3 centimeters from each other. Insert a metal profile or metal rolling between them.
Important! Pay attention to the fact that under the influence of physical efforts the metal can bend in completely unnecessary places.Therefore, in order for the table legs to be symmetrical, the results of bending must be constantly checked.
- Collect all the ready-made elements of the future product, if necessary - cut off the excess.
- Weld the workpieces first on one side of the future product, and then on the second. Do this very carefully so that welding growths do not form.
- At the end of welding, clean the entire structure.
- Weld the forging elements in the same way to the finished base, and then brush them.
- Treat all elements of the future product with a white primer to work on metal.
Important! White or epoxy primer needed so that you don’t miss anything during painting.
- Using a roller or a narrow brush, paint over the entire metal frame in the color you want.
Important! Forged legs are most often painted in gold, bronze, black, white and silver.
- Use wood screws to attach the wood worktop. To do this, make holes in the metal frame that will be slightly larger in diameter than the screws.
Important! Pay attention to the fact that the fastening of the legs to the countertop depends solely on what kind of legs you made under the table (their number, size and shape).
That's all, your table is ready! You can use it as such or optionally decorate it. For example, a mosaic, decoupage decor or regular coloring will be an excellent option. In this case, everything absolutely depends on your taste preferences and imagination.
to contents ↑DIY metal garden furniture
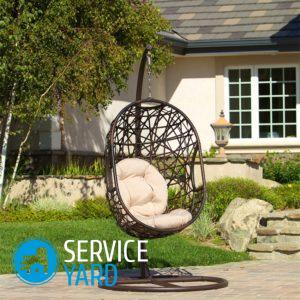
We suggest that you make your own garden swing. Today they are quite popular in private households. To make them you will need:
- Metal profile and rods;
- Welding machine;
- Bending device;
- Bulgarian.
After you have prepared all the necessary tools, you can proceed directly to work. The sequence of actions is as follows:
- Using a bending device, bend the frame from the profile and weld all its elements together.
- As for decorative elements, in order to make them, heat the metal and bend it to the shape you need.
- Finished decorative parts, rods and curved beams are welded to the frame so that you get a beautiful lattice.
- Attach the upper rails on which the canopy will be attached to the side racks of the frame.
- From the metal plates, make stands for the steps, weld them to the stands of the swing.
- Weld the top and bottom of the structure.
- Sand the bars and coat them with varnish.
- Paint the entire metal part of the structure with black paint.
- In order to make a swing seat, weld together the curved parts of the metal profile and drill holes through which the rails will be attached to the metal using self-tapping screws.
Swing is ready! Now you can safely install it in your country house or in the garden.
to contents ↑Important! However, the garden is easy to decorate not only with metal furniture. The main thing is to connect imagination, and how to bring them to life we will tell you, on the pages of our site.
Stock footage
As you can see, the independent manufacture of metal furniture, although not a complex process, nevertheless, requires attention and patience. If you possess such qualities, applying our advice and recommendations in practice, you can make truly imperial pieces of furniture that will become your pride and main decorative accent in a house or on a personal plot.


