DIY lift bed

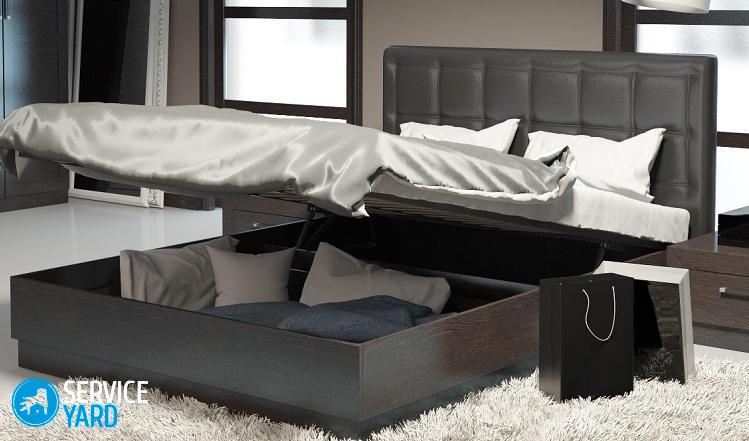
Given the lack of space in modern apartments, the placement of oversized furniture such as a bed can become an insoluble problem. Cots and sofa beds, of course, can solve this issue, but every day you will need to assemble and disassemble the structure. And this is a waste of time, which is often not enough, and everything else, such daily “exercises” quickly wear out the mechanisms. You can save space and get a full-fledged berth if you install a lifting bed in the apartment. But the offers of outlets in terms of choosing such furniture are very limited, and it is almost impossible to buy ready-made. And the price will surprise even those who have seen a lot of buyers. Therefore, a bed with a do-it-yourself lifting mechanism will be a great option.
to contents ↑Dimensions
Before you begin to manufacture a bed with a lifting mechanism with your own hands, it is worth preparing drawings. Do not take as a basis any generally accepted sizes. Make a model that will fully and fully meet your parameters. To measure them, you will need a tape measure, a notebook, a pen and an assistant:
- Lie on the floor, close your fingers and spread your elbows apart. Ask your assistant to measure the distance from the elbow to the elbow. To this value add 10-15 centimeters on each side, the so-called comfort zone. This will be the width of your future vacation spot. If you plan to make a double bed, then the resulting value must be summarized.
- Then measure your height. This can also be done while lying down. To the obtained value add 30-40 centimeters - a comfort zone, and the desired length.
- The height of the average bed is 50-60 centimeters. But here it is worth considering some nuances. If the berth is intended for a person of age, then it is better to increase this value. If you plan to make a podium bed with a lifting mechanism with your own hands, then it is better to reduce the average data.
to contents ↑Important! In order to calculate the load on the bed with a lifting mechanism with your own hands, special knowledge in mathematics is not necessary. To the weight of one or two users, if you plan to make a double bed, 15% of the safety margin is added.
Materials and Tools
Making a bed frame with a lifting mechanism with your own hands is not as difficult as it might seem. Any person with minimal skills in joinery work is able to cope with this task, it is enough to acquire the necessary tools and materials:
- Do-it-yourself bed frame in most cases is made only of wooden beams. This is the most affordable, durable and environmentally friendly material.
- If you want to complicate the task and you have the skills to work with a welding machine, then the frame can be metal. But processing and mounting a wooden base is still easier.
- For backs and sides, masters recommend choosing a particleboard or MDF. The latter option is preferable, since its density, respectively, durability is higher. In addition, when assembling the bed, some of its parts will have to be glued.
Important! For MDF, an ordinary PVA or similar “Joiner” is suitable. When gluing a laminated particleboard, nitro glue is needed, which is not always desirable.
- You can make the bottom of the bed from plywood or from slats. Plywood is a cheaper and more affordable option, slats are more convenient to use. This material can be made by yourself, or you can order ready-made, orthopedic parts that have a slightly convex shape.
Most of the work in the manufacturing process of a do-it-yourself bed will be associated with wood processing, so the appropriate tool will be required:
- electric jigsaw;
- a screwdriver and a set of bits for it;
- welding machine;
- grinder with a disc for metal;
- roulette;
- level;
- marker, pencil;
- steel strips;
- upholstery fabric;
- foam rubber;
- furniture stapler;
- building hair dryer.
Mounting, depending on the design of the lifting bed with your own hands, you may need different things. Most commonly used is:
- Self-tapping screws are not ordinary, but phosphated. They have a rough surface and adhesion to a glued surface is much stronger. The diameter is better to choose no more than 6 millimeters, and the length should be equal to the sum of the thickness of the parts that it connects minus 10 mm.
- Metal corners - here it is better to opt for parts with a rounded wide stiffener. There should be no barbs on such mounts - this is the first sign of overtightened metal.
- Nails in 60-70 mm with a ring notch.
- Some craftsmen use dowels when assembling a lifting bed with their own hands, but it is better to replace them with dowels. They provide a more durable and reliable connection of parts.
Before you make a bed with a lifting mechanism with your own hands, stock up on a clamp. It will provide density and strength to both individual joints and the structure as a whole.
to contents ↑Construction and mechanism
A quick glance at any photo of a bed with a lifting mechanism with your own hands is enough to understand that it is a closet with a “folding bed” built in it. Do-it-yourself design of the lifting bed consists of a base and a frame, which is mounted on the wall. The vertical and horizontal position is attached using a lifting mechanism. It can be of three types:
- Manual lifting is the most affordable and easiest. It has no shock absorbers or springs. Ideal for a bed for adults, since when opening the box you need to make considerable efforts, children can not cope with such a load. The main advantage is strength and durability.
- The spring mechanism also does not cause owners any particular trouble. But he has a major drawback - the springs quickly wear out and stretch. Therefore, its service life is from 3 years to 5. Then, the springs will require replacement. A big plus of this mechanism is the price, it is relatively small. Due to this, the springs are in great demand among those who are going to mount a bed with a lifting mechanism with their own hands.
- Gas shock absorber is the most convenient, reliable, durable mechanism. It works smoothly, silently, practically without human intervention. The lifespan for daily use is up to 10 years. Choosing such a device should be based on the size of the frame. The mechanism on gas shock absorbers is expensive, but, at the same time, in demand. It is also ideal for a double bed with a do-it-yourself lifting mechanism, as this option is more durable and hardy.
Drawing drawing
An attempt to realize everything at once - without drawings, competent calculation, preliminary preparation and marking - leads to damage to the material due to the constant introduction of changes in the design of the product. Therefore, after preparing the necessary tools, materials, we sit down to make drawings of the bed with a lifting mechanism. In this case, you should know the following nuances:
- The height of the legs, sides and the height of the part of the mattress protruding above the sides is the total height of the berth, on which the depth of the cabinet structure depends. Usually it is about 450 millimeters - it is convenient to sit down.
- If the mechanism has a thickness of 32 mm, then the gaps between the sides of the bed and the sides of the cabinet will be 32 mm on each side.
- Accordingly, when calculating, the width of the berth, the thickness of the sides of the base, the gaps for installing the mechanism and the thickness of the sides of the cabinet are taken into account.
- Creating a bed with a lifting mechanism with your own hands, we even determine the location of the beam on the back and the drawer on the drawing. Here the calculation is as follows. If the mattress is in the sunbed, then the indent from the upper edge of the sidewall is the sum of 30-50 mm and the thickness of the bottom - boards or plywood sheets. If the mattress is on top, then the indent will be the thickness of the flooring.
to contents ↑Important! Before you make a bed with a lifting mechanism yourself, do not forget to not only create a place for work, but also remove the baseboard along the wall to which the furniture will adjoin.
Main works
Any do-it-yourself lifting bed consists of a supporting frame. In order to make it, you will need wooden bars. It is better to take a thickness of 50 to 50 millimeters. The outer part includes the headboard, footboard and sidewalls, which the pros call tzars. The frame is covered with boards, slats or a sheet of plywood - this creates the bottom of the future berth.
The process of assembling a bed with a lifting mechanism with your own hands consists of the following steps:
- We prepare the back and sides, their maximum thickness should be no more than 40 millimeters. Even before starting work on these workpieces, we make an edge.
- From ordinary, best planed, planks, we cut the czars. Their thickness is 40-60 millimeters, width - no more than 200 millimeters.
Important! It’s better to paint or varnish these preparatory stages.
- The beam, which we will use for the frame, is treated with an antiseptic to protect the tree from traces of time. We determine their sizes even at the stage of building the drawing, and they depend on your parameters that you have already measured.
- Do-it-yourself corner joints make the most important task. They will withstand the main load. Therefore, the fasteners in these places duplicate. The backs and sidewalls are interconnected with dowels, and choose the bars in a quarter.
- Drill holes for fasteners, in particular for pins, in advance. Connecting parts even with self-tapping screws, reinforce all joints with glue and hold with a clamp for a day.
Important! All the holes that are made when assembling a bed with a lifting mechanism with your own hands are deaf. Through drilling is not allowed.
- After the beam is firmly glued and fixed with screws, make a preliminary assembly. The backs are mounted vertically, on temporary supports, then the sidewalls are superimposed. After - be sure to check how straight the corners of the structure are.
- Then tie the structure with a rope, and mark the holes for the pins on the backs with a pencil - 2 per end. Then the tsars are removed, holes are made in the backs, the holes are smeared with some kind of coloring compound - at least a felt-tip pen. Again, connect the tsars and backs so that the place for the reciprocal part of the hole is imprinted on the sidewall boards. Disassemble the future lifting bed with your own hands, in the drawers, drill holes for the holes.
- Coat the holes on the drawers with glue, insert the pins into the holes and hold with a clamp. Then, collect the bed on the pins, that is, put the back on the pins in the drawers and move the mallet to a snug fit. At the same time, coat the quarters of the frame with glue.
- Pull the frame with a rope in three turns. To tighten the tension between the rope and the bed, insert pieces of pipe, piece of wood, etc. The rope should be very tight. In this position, the product remains 2-4 days.
- Drill holes for the pins in the frame, install also on the glue. The skin is not removed. After drying, the corners are duplicated by metal corners.
Important! In the construction with backs, legs are not needed, since it rests on the headboard and foot, but if desired, they can be installed by fixing to the bar frame.
- Fix the flooring from boards with a thickness of 20 mm and a width of 80-100 mm on glue and nails. On each edge - 2 nails.
Important! If a rack bottom is purchased, then the lag holders are distributed over the frame, and the racks are fixed in them.
As you can see, the solution to the question of how to make a bed with a lifting mechanism with your own hands is not so simple as it might seem at first glance. Lay 2-3 days in advance for these works, which will be necessary not only for installation, but also for drying the joints.
to contents ↑Double bed
A double bed with a do-it-yourself lifting mechanism is created in the same way. But there is one caveat: since the design must withstand double load, it must be strengthened with a spar. This is a longitudinal ligament from a 40 by 100 millimeter board:
- If necessary - you can make not 1, but 3 spars at once, arranging them evenly throughout the structure.
- This giver is attached to glue and nails - 2 nails on each side diagonally. For greater strength, it is worth duplicating such joints with steel corners.
- A part such as a spar should be in one plane with the frame. The angles at which it is located should also be perfectly even.
Mechanism installation
Do-it-yourself lifting bed is not an easy and painstaking process, it consists of several important stages. After assembling the frame and the berth, you need to do the installation of the lifting mechanism on the bed with your own hands:
- Mark on the box places for fasteners, drill holes.
- Secure the bottom of the mechanism with bolts.
- Mount the corner of the device to the frame of the structure.
- Lower the base of the product inside the bed frame and mark 4 holes on each side of the frame so that they correspond to the bottom bracket of the mechanism.
- Open the frame and drill holes in it.
- Fix the top plate of the mechanism with 4 screws so that there is sufficient clearance between the frame and the box for its functioning.
to contents ↑Important! After the installation of the lifting mechanism on the bed with your own hands is completed, its work should be carefully checked, if necessary, adjusted. During installation, it is important to consider that the attachment points of the elevator must be firmly held by the eye with a bolt. The installation must be done in such a way that the fittings are freely operated, and the movement to rise and descent is performed without difficulty.
Additional frame
The strength of any bed with a do-it-yourself lifting mechanism can be increased with the help of a specially made steel frame. With bed sizes from double and higher, this is as important as for non-standard shaped beds:
- The do-it-yourself bed frame is made of the same steel profile as the lifting mechanism, or a slightly larger section. Overall dimensions must be pre-designed in accordance with the design, sawing the profile into workpieces is carried out using a grinder. Parts are connected by a neat weld.
- It is absolutely necessary to install transverse racks between the longitudinal and transverse elements in the corners of their connection, which will add strength structures and prevent it from folding under loads during operation.
Sheathing
When the do-it-yourself lifting bed design is ready, it needs to be sheathed. This is done in order to:
- hide wireframe, frame elements;
- get a comfortable and soft bed;
- give the furniture an aesthetic look.
Here is the principle by which this work is carried out:
- First of all, lay on the base sheet foam rubber - determine the optimal number of layers yourself.
- Top cover it with upholstery. It can be not only tissue, but also dermatin or skin.
- Fasten the upholstery to the frame of the lifting bed with the help of a furniture stapler: its steel brackets are firmly driven into the base, but at the same time remain invisible on the upholstery, so they do not spoil the appearance of the furniture.
- Also do not forget to revet with decorative material and lateral parts of a bed.
Important! In those places where the finish will often come in contact with the lifting mechanism, you can make small linings under the main material.
After sheathing, it remains only to establish the finishing accessories: supporting legs, wheels or rollers.
to contents ↑Stock footage
Thus, if you understand the instructions, then even making such a complex piece of furniture as a bed with a do-it-yourself lifting mechanism will be a feasible task. So do not rush to spend money on a store product - with some effort and time, you can get a no less attractive model, but several times cheaper.


